Thursday, November 29, 2012

DIY String Lantern

So for Christmas I thought it would be so neat to have these giant String Lanterns hanging from the trees in our front yard. That was my plan anyways.


The supplies needed for the Lanterns:
String
4 oz of White Glue
balloon
1/2 Cup of Cornstarch
bowl
1/4 Cup of warm water
tarp
help!

I also bought a battery powered mini light kit from Hobby Lobby for $1.99


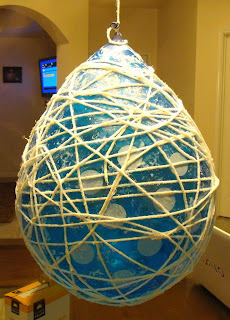
First thing you should do is blow up a balloon to the size you want your Lantern & then hang it from somewhere with a tarp under it. For some reason i thought this step wasn't necessary. Later on i realize why this was important.


Then  mix  the cornstarch, glue & water together in a large bowl. Place the string in the glue mixture & start wrapping the balloon.
This was another important step I didn't do right. I didn't put any water in my bowl so my mixture
was extremely thick!
 I was sticking to everything! I couldn't wrap the string around the balloon with out the newspaper sticking to me or the balloon. The mixture was the consistency  of  play dough & it was all over me.
By this time I was ready to give up....


Finally the lantern was hung.
This made the project a lot more enjoyable.
Finish covering the balloon with the string. I could of done more but I was ready for this Lantern to be done.

Let the Balloon hang overnight to dry. 
Then pop the balloon & pull out the balloon pieces from the lantern.


I wrapped  the Lantern with the light kit & hung it from our Gazebo instead.

Hopefully this tutorial helped you  make your Lantern. If anything teach you what NOT to do.
Have a Awesome Day!


Sunday, November 25, 2012

DIY Easy Christmas Ball Ornaments

For my first ever Blog I wanted to show you these AWESOME Christmas Ball Ornaments & give you a short tutorial on how easy they were to make. I got the idea from Strawberry Chic http://strawberry-chic.blogspot.com/2011/11/diy-tuesday-felt-ornament.html#
 who did a great tutorial on DIY Felt Ornaments. I used card stock instead of felt . I also thought it might be quicker to punch out the circles so i used a 1" Scalloped circle punch.The ornaments were really fun to make & turned out really cute.
Here is the supply list:
Foam ball
ribbon
card stock paper 
1" circle punch (I used scalloped)
hot glue gun
scissors
First thing I did was glue a ribbon to the top of the foam ball so that the ornament can hang from the tree.
Next step was to punch out about 50 circles. My 7 year old daughter had alot of fun doing this.I used 3 different sheets of card stock with different patterns.

Then with scissors cut a small slit half way down the center of the circles to make the cone shape.

Then use a drop of glue so that the cone stays in place.


After you have all the cones made its time to glue them to the foam ball.


Put a good size drop of hot glue on the point of the cone & then glue the cone to the foam ball. Hold in place for a few seconds to ensure that the glue has dried.


Continue gluing your cones till the entire ball is covered. I did have to re glue a few cones that fell off & any of the cones  that seemed loose. I noticed that the second ornament I made I glued the cones closer together  which I liked a bit more.

I don't quite have our Christmas Tree up yet but I did want you to get an idea of what it would look like hanging...

Thank you for taking the time to check out my first blog! I hope you enjoy making these Ornaments. They really were easy to make  & we had alot of fun doing it!